An ESPhome-Dashboard for my Ecovacs robot.
Posted on June 11, 2026 | Reading time 9 minutesI have an Ecovacs vacuum robot in my home that is embedded into Home Assistant. For ease of use, I wanted a dashboard that can easily start and stop the robot, and control where it goes. This allows easy control by multiple users, because sharing the robot via the app has been mostly frustrating with disconnects and resets of the vacuum.
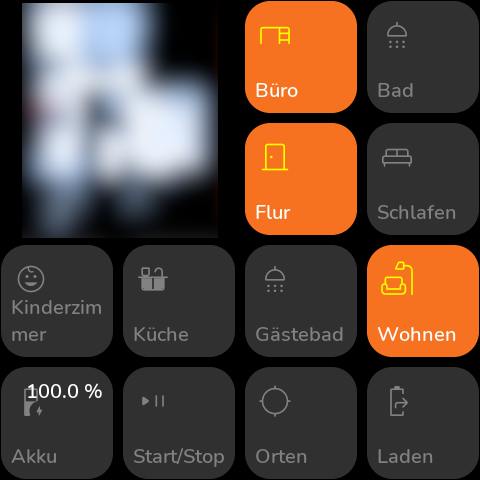
My dashboard, the map has been redacted. Users can select the rooms to clean and start/stop/return the vacuum.
General requirements
The entire setup features a Home Assistant installation. To prepare images for the ESPHome device, I run ImgProxy in a docker container. The service allows to resize remote images and convert them to a desired format.
You can link the images directly, however you should be mindful of the limited RAM of the esp devices. I use various helpers in Home Assistant to keep track of the areas to clean and to expose the map to the dashboard.
I develop the main interface on my machine using Visual Studio code. For that I have installed ESPHome on my machine. You can follow this forum post on the Home Assistant community to get started.
For the dashboard itself, I use the “templates” of esphome-modular-lvgl-buttons. They provide an easy start, although a lot of it seems vibe-coded. Major changes tend to creep into the project without migration guides. I have forked the project, which makes modifications easier and allows me to better react to changes (or postpone updates).
File and folder structure
To get started with esphome-modular-lvgl-buttons you copy the respective files from the example-code-folder into the main folder. I have a file for local testing (based on the SDL configuration) and a real file for the physical dashboard. For the first run you might need to run esphome compile XXXX.yaml. The resulting firmware can be flashed via the ESPHome interface. After that esphome run XXXX.yaml will usually build and flash the device if you are on the same network.
| |
For testing with the SDL file, I run esphome run dashboard-testing.yaml which allows easy development on the local machine. Both dashboard-files link to the common layout file so that code is shared between both configurations. This is done by extending the packages section to link layout.yaml.
| |
If your layout is more complex, you can further split it into more files, e.g. grouped by pages or areas. This makes maintenance much easier. I have the entire folder version controlled on GitHub as a private repository to keep track of changes.
Preparing Home Assistant
You need to map your vacuum to the correct areas which is usually done when you set up the integration.
Helpers
Various helpers are required to keep track of changes. You need to add them via the helpers section.
- An
input_booleanfor each area, e.g.input_boolean.clean_living_area,input_boolean.clean_kitchen, … These store where you want your robot to go. Having them in Home Assistant will also sync changes between multiple dashboards. - Two
input_booleanfor start/stop (input_boolean.start_stop_vacuum) and return (input_boolean.return_vacuum) - For the map, I have a template sensor that provides an url with the template
{{ ("http://homeassistant:8123" + state_attr("image.[The map id]", "entity_picture")) | base64_encode }}namedsensor.vacuum_map - A script to start the vacuum based on your input booleans. This script iterates your input booleans and creates a list of areas. Make sure that the name of the areas match the mapping of your vacuum.
1 2 3 4 5 6 7 8 9 10 11 12 13 14 15 16 17 18sequence: - action: vacuum.clean_area metadata: {} target: device_id: ..your vacuum id.. data: cleaning_area_id: > {% set my_list = [] %} {% if states('input_boolean.clean_living_area') == "on" %} {% set my_list = my_list + ['living_area'] %} {% endif %} {% if states('input_boolean.clean_kitchen') == "on" %} {% set my_list = my_list + ['kitchen'] %} {% endif %} ... {{ my_list }} alias: Start Cleaning Based On Input Booleans description: "" - An automation to stop the vacuum when it is cleaning
1 2 3 4 5 6 7 8 9 10 11 12 13 14 15 16 17 18 19 20 21 22 23alias: Stop vacuum via display description: "" triggers: - trigger: state entity_id: - input_boolean.start_stop_vacuum from: - "on" to: - "off" conditions: - condition: device device_id: ..your vacuum id.. domain: vacuum entity_id: ..your vacuum entity id.. type: is_cleaning actions: - action: vacuum.stop metadata: {} target: device_id: ..your vacuum id.. data: {} mode: single - An automation to return the vacuum, that also turns off the return button
1 2 3 4 5 6 7 8 9 10 11 12 13 14 15 16 17 18 19 20 21 22 23alias: Return vacuum via display description: "" triggers: - trigger: state entity_id: - input_boolean.return_vacuum from: - "off" to: - "on" conditions: [] actions: - action: vacuum.return_to_base metadata: {} target: device_id: ..your vacuum id.. data: {} - action: input_boolean.turn_off metadata: {} target: entity_id: input_boolean.return_vacuum data: {} mode: single - If your vacuum integration features a “relocate” function to locate the vacuum, you might also want to add a
input_boolean.locate_vacuumthat links to the relocation function via a script:1 2 3 4 5 6 7 8 9 10 11 12 13 14 15 16 17 18 19 20 21 22 23alias: Relocate Vacuum description: "" triggers: - trigger: state entity_id: - input_boolean.locate_vacuum from: - "off" to: - "on" conditions: [] actions: - action: button.press metadata: {} target: entity_id: button.[Your relocate button id] data: {} - action: input_boolean.turn_off metadata: {} target: entity_id: input_boolean.locate_vacuum data: {} mode: single
The ESPHome dashboard
Map image
The map is loaded via an online_image. It runs through a self-hosted ImgProxy service to resize. You can also link the image directly, which can cause issues if it is the wrong dimension. You can also try FlyImg if you want another service, I had however issues with caching. The image is updated on an interval. The update is based on the current page index, so updates only run when required. Without the condition online_image updates can cause display freezes.
| |
The vacuum dashboard with maps
The following code adds the vacuum page with the map
| |
Adding the buttons
- For your custom area buttons, simply add as many as you want, taking care of using the correct row and column index, e.g.:
1 2 3 4 5 6 7 8 9 10 11 12 13 14 15 16 17 18 19 20 21 22 23button_clean_kitchen: !include file: ../esphome-modular-lvgl-buttons/ui/switch/remote.yaml vars: uid: button_clean_kitchen page_id: vacuum_page row: 2 column: 2 entity_id: input_boolean.clean_kitchen icon: $mdi_kitchen text: "Kitchen" button_clean_living_area: !include file: ../esphome-modular-lvgl-buttons/ui/switch/remote.yaml vars: uid: button_clean_living_area page_id: vacuum_page row: 2 column: 3 entity_id: input_boolean.clean_living_area icon: $mdi_sofa text: "Living" ..... - You also need to add the start/stop and charge buttons. I have also added a battery sensor and a relocate button
1 2 3 4 5 6 7 8 9 10 11 12 13 14 15 16 17 18 19 20 21 22 23 24 25 26 27 28 29 30 31 32 33 34 35 36 37 38 39 40 41 42button_start_stop: !include file: ../esphome-modular-lvgl-buttons/ui/switch/remote.yaml vars: uid: button_start_stop page_id: vacuum_page row: 3 column: 1 entity_id: input_boolean.start_stop_vacuum text: "Start/Stop" button_locate_vacuum: !include file: ../esphome-modular-lvgl-buttons/ui/switch/remote.yaml vars: uid: button_locate_vacuum page_id: vacuum_page row: 3 column: 2 entity_id: input_boolean.locate_vacuum text: "Locate" button_return_vacuum: !include file: ../esphome-modular-lvgl-buttons/ui/switch/remote.yaml vars: uid: button_return_vacuum page_id: vacuum_page row: 3 column: 3 entity_id: input_boolean.return_vacuum text: "Charge" button_sensor_battery: !include file: ../esphome-modular-lvgl-buttons/ui/sensor/local.yaml vars: uid: button_sensor_battery page_id: vacuum_page row: 3 column_span: 1 row_span: 1 column: 0 entity_id: [... sensor id of your vacuum battery level ...] text: "Battery" unit: "%"
Final automation
The final automation links the display to Home Assistant. I have two triggers in it, one for the SDL testing dashboard and one for the physical dashboard.
- An automation that triggers the cleaning script when the start/stop boolean changes
1 2 3 4 5 6 7 8 9 10 11 12 13 14 15 16 17 18 19 20 21 22 23alias: SDL Start Vacuum description: "" triggers: - trigger: state entity_id: - binary_sensor.[SDL entity]_start_stop_vacuum from: - "off" to: - "on" - trigger: state entity_id: - binary_sensor.[Physical entity]_start_stop_vacuum from: - "off" to: - "on" conditions: [] actions: - action: script.start_cleaning metadata: {} data: {} mode: single - Optional: you can also create an automation that turns off your input_booleans when your vacuum returns. This provides a “clean state” for your dashboard when your vacuum has finished
1 2 3 4 5 6 7 8 9 10 11 12 13 14 15 16 17 18 19 20 21 22alias: Reset input_booleans for vacuum dashboard description: "" triggers: - trigger: state entity_id: - ..your vacuum id.. to: - docked conditions: [] actions: - action: input_boolean.turn_off metadata: {} target: entity_id: - input_boolean.return_vacuum - input_boolean.start_stop_vacuum - input_boolean.locate_vacuum - input_boolean.clean_living_area - input_boolean.clean_kitchen - ... data: {} mode: single
Conclusion
The final combination of helpers, scripts, automations and the EPSHome project allows you (and everyone else) to control your vacuum via an easy to use dashboard. When adding new areas, you can simply create new input_booleans and add new remote buttons to control them.
This setup also allows you to control the vacuum via your normal dashboard by adding buttons for the input_booleans and a button to trigger the script. Changes in the selection are reflected between all dashboard.