Anki Templates - An introduction to HTML
Posted on September 28, 2018 | Reading time 6 minutes- A short overview about the “building blocks” for templates is given
- HTML elements and attributes are explained
- Basic elements are outlined, together with their usage
HTML and CSS are the base of each Anki template. And while these languages offer great possibilities for customization, they are easy to pick up. This post will get you started with templates and HTML. A future post focuses on CSS.
Notes, Templates, Cards and Fields
When you add stuff in Anki, you create a note. A note holds your information in fields (e.g. the default note has two fields - a front and a back field). Using templates, Anki then turns this information into one or multiple cards.
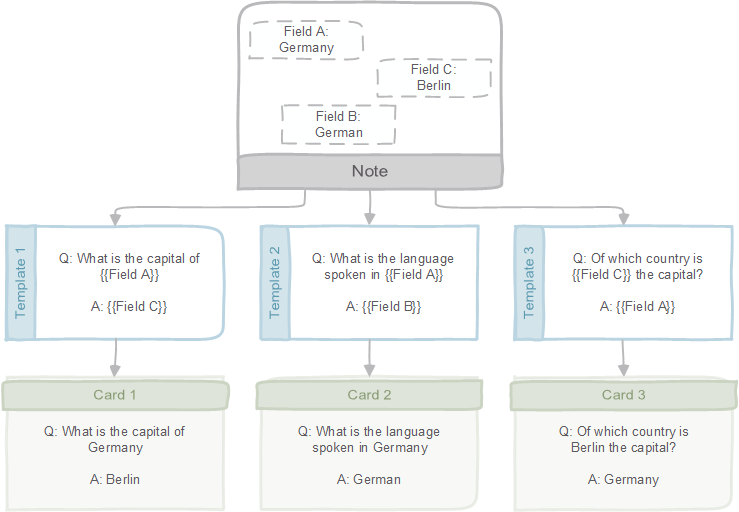
By creating templates for your cards, you can easily cut back on retyping. In the example above, a single note creates three cards. And you don’t have to retype the question on each card. Isn’t that useful?
Fields can be added via the Fields… button when creating a note. The templates themselves are edited via the Cards… button. You can also reach the edit screen via Tools → Manage Note Types.
Each card requires a template for the front and the back side. If you wish to create multiple cards from a note, you can add another one via the button at the top right (the “+"-button).
To actually insert the stuff you type into your note, Anki has certain placeholders, which will be replaced when your card is displayed.
- A simple {{field}} will be replaced with the content
- A {{hint:field}} will reveal display the content of your field as hint, i.e. it will reveal the content of the field when you click a link
- {{type:field}} creates a text input, that is checked once you go to the back of your card
- There are also “automatic” fields ({{Tags}}, {{Type}}, {{Deck}}, {{Subdeck}}, {{Card}}, and {{FrontSide}}) containing the corresponding information
It’s also possible to use conditions, as illustrated by the following:
| |
Building blocks of HTML
Tags
The basic building block of HTML are tags. Consider the following HTML code:
See the Pen jeEjdO by Chris (@ChrisK91) on CodePen.
Here we have some content (This is a paragraph), which is enclosed by an opening tag (<p>) and a closing tag (</p>). In other words: tags are some keywords that tell your browser (or Anki), what it should do with some content. The p-tag creates a paragraph. You can think of paragraphs as blocks of text.
In Anki, you don’t actually need to wrap your fields inside p-tags. There are two reasons for that:
- You can simply write “raw” text, and it will print just fine.
- Anki sometimes creates HTML when you add stuff to your notes (for instance an image or table) in that case, nesting the field might create some funky results.
So you don’t usually have to write <p>{{field}}</p>, writing {{field}} will suffice.
Let’s examine some tags that might be more useful for Anki cards. Imagine we have a simple note type that can hold a country, the language of that country and the capital. Let’s create a template that asks about the capital of a country.
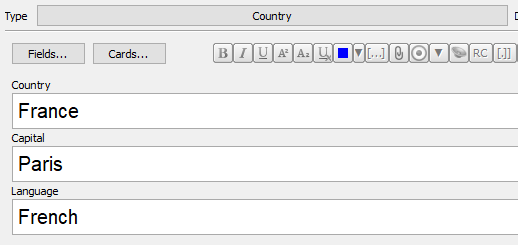
New cards can be created via the "Type" button. The fields can be added and renamed via the "Fields..." button
See the Pen rqaXxm by Chris (@ChrisK91) on CodePen.
The above code would go on the front. We have a tag <br> which creates a line break. This doesn’t have a closing tag (you can’t put content in a line break). Tags without closing tags are called empty or void elements.
New lines (and repeated white spaces) are ignored in HTML, so we need special instructions to create them.
The <b>-tag by default causes its content to be bold.
Some other useful tags to “style” text are:
<b></b>,<strong></strong>: will display the text in bold<i></i>,<em></em>: will display the text in italic (em from emphasis)<u></u>: will underline text<s></s>: will strike through text<sub></sub>,<sup></sup>: will subset and superset text<hr>creates a horizontal line/rule.- And the already mentioned
<br>will create a line break
To ask for a language, we could now create a template like the following:
See the Pen wYBVqB by Chris (@ChrisK91) on CodePen.
Attributes
Some tags can have additional “information”, in form of attributes. For instance for a link, we would need to specify the location we want to link to. Let’s say we want to add a link to a Wikipedia search to our cards in the template:
See the Pen QZwemK by Chris (@ChrisK91) on CodePen.
Here we have a new tag <a> which is an anchor. This anchor can link to a website (or file, etc.) when the href attribute is set. In this case, this attribute is set to https://en.wikipedia.org/w/index.php?search={{Country}} (everything in between the quotation marks). When the card is created, {{Country}} is replaced with France. By setting target to _blank we instruct the browser/Anki to open the link in a new tab.
Note: you can only use fields inside attributes, when they are a single line of text. If you for instance put an image in a field, Anki will create some HTML. This HTML code is then placed in this attribute, creating some weird end results.
Some other tags with attributes are:
<img src="image.jpg">displays the file “image.jpg” inside yourcollection.mediafolder<abbr title="Arteria">A.</abbr>is used to indicate an abbreviation. The content of thetitleattribute is display, when you hover over the content of the tag.
There are also some attributes which are more important for styling and scripting purposes. These attributes can be applied to (almost) all elements and include:
class="name", wherenamecan be shared with multiple elements. An element can have multiple classes, separated by spaces. More on that in the CSS tutorial.id="id", whereidhas to be unique (it can be a combination of letters, numbers, underscores, etc.)
Special characters
There are some special characters, that need to be written with a special representation. Earlier, we learned that multiple spaces are ignored in HTML. Or what if you want to simply write <p>?
See the Pen gBbVyp by Chris (@ChrisK91) on CodePen.
These special characters are written in the form of &CODE;. There are lists where you can look up representations of special characters, arrows, etc. One list is linked at the end.
Conclusion
I think this basic outline should get you started with most of your template needs. In most cases, only some simple text styles go a long way in creating simple, yet effective cards. For example the one below:
See the Pen QZbLLg by Chris (@ChrisK91) on CodePen.
Spending a few minutes to create templates will save you quite some time in the long run. And it’s really something that is learning by doing. A future post will touch on styling cards with CSS.
And please don’t hesitate to contact me via the comments below if you have any questions!