CSS in Anki — Beyond the basics
Posted on February 17, 2018 | Reading time 7 minutes- A few ressources are given, to get your started with CSS
- I will highlight some cases/code where CSS can add helpful tips/hints to your cards
Prerequisites and getting started
Under the hood, every Anki card is actually displayed as a website. These templates can be edited using the internal editor, located under the Cards button (when you edit cards). For this highlight of CSS uses in Anki, I assume that you are familiar with editing cards and note types. If these things are new to you, you can read up on them in the official Anki manual (Sections “Adding a note type” and “Cards and templates”). The introduction also covers HTML and CSS, so I’m assuming you’re familiar with that as well. A short introduction into HTML can be found here. I have some links at the end, if you want to get deeper into CSS.
If you have a lot of shared CSS code, you can also put this code in a central file, and edit it from there. This is a more or less undocumented feature, and I wrote about it here.
I highly recommend the add-on View HTML source with JavaScript and CSS styles, which sadly isn’t available from AnkiWeb anymore. I re-uploaded it here. Download the file, and place it in your add-on folder, which you can find in Anki under Tools → Addons → Open Addons folder. It makes debugging your cards a little easier.
While we can use a lot of HTML tag's, this doesn't mean we should...
Creating visual clues based on deck
Let’s suppose I have a lot of decks, and I want to create an indicator to show, where the card is from. In my main deck, this also gives me a sense of where I am in my reviews, since you do your reviews deck-vise (e.g. all reviews from subdeck A will come before you review subdeck B).

A grand total of two subdecks...
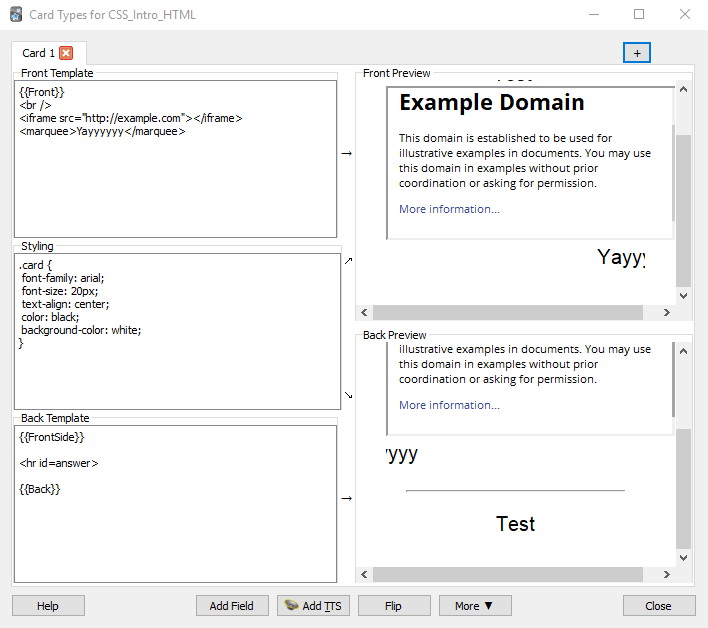
We will use a stylized div. A div element is a block element - it will be displayed as a rectangle. We will modify this element, to stretch all the way across the top. On the front, we will first add <div class="topbar"> </div>, and then style it with:
| |
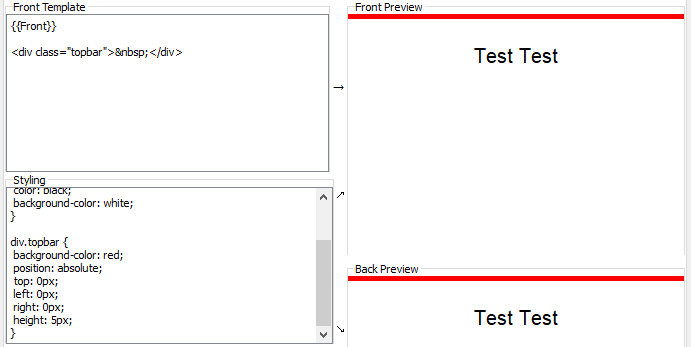
A red bar is now visible at the top of our cards
First, by changing position to absolute, we allow us to specify the exact position of the element. We then tell Anki to put our element all the way to the top, to the left and to the right. The latter causes the element to stretch all the way to the right. The height is set to 5px. If you look at the code, we’ve also added a special there. This is to force the display of a space character. Otherwise, our element might not be created, since it is empty.
So, now we want to make this bar take a certain color depending on the deck the card is in. We will utilize the {{Subdeck}} field for that. We need to change our HTML slightly, to <div class="topbar {{Subdeck}}"> </div>. This will cause our underlying HTML to change as well — the name of the subdeck will be inserted, and the resulting HTML will look something like this <div class="topbar My first subdeck"> </div>.
Now, you might see where this is going… We are using the name of the subdeck as CSS class. In order for our trick to work, we now need to look for words, that are unique for our subdecks.
My subdecks are named “My first subdeck” and “My second subdeck”. Both words “My” and “subdeck” occur in both names. Unique words are “second” and “first”. Let’s use these as class to color the topbar. I will also make it gray by default:
| |

The bar is now green, as defined by our subdeck
Please note, that the template editor doesn’t always account for the right subdeck your currently in, so it might show a “wrong” color during editing. Since .first and .second are also some pretty generic classes, I apply the style here only to elements, that have both classes, .topbar and either .first or .second.
Also note, that the {{Subdeck}} (in the HTML on the front) comes after the topbar-class, so it has higher priority and can override the more generic styles.
Contextual images based on tags
Sometimes, you might want to display an image, depending on a category on your card. You can achieve this either by pasting the image directly, or we can for instance show a small image depending on a tag. In this example, I have a lot of cards containing either food or drinks. I want a small image to appear on the back, depending on the category.
For that, I have tagged my cards with the food tag, when they are about food, and for drinks vice versa. I’ve placed two image files (named “_food” and “_drink”) in my collection.media folder (on Windows %APPDATA%\Anki2, on Mac ~/Library/Application Support/Anki2, on Linux ~/.local/share/Anki2, see the official documentation if you can’t find it). If you name the files with a leading underscore, Anki won’t remove them, when you check for unused media.
I’ve added both images on the back of the card:
| |
And styled them with:
| |
Again, we will use a field to selectively display an image, this time {{Tags}}. We can change the image, using the content property.
| |
And style them with:
| |

The food-tag displays a bread...
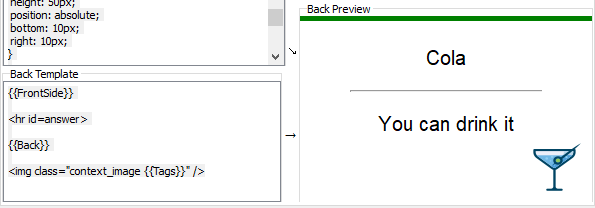
... and the drink-tag displays a cocktail.
Changing the background
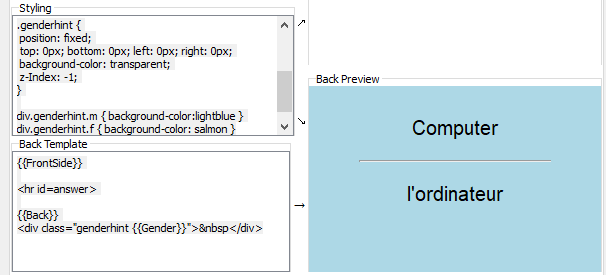
The last example comes from Reddit, where someone wanted to change the card background based on the gender of a card. For that, I added a “gender” field to my card. This field is either “m” for male or “f” for female. Based on these, I want the background on the back to be either blue or red.
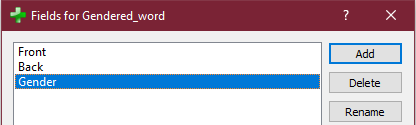
You can add fields via the "fields" button in the editor.
The code here is pretty straight forward. We will again use a div-Element, but this time stretch it all the way over our card. We can position the element on the back, using the z-Index. Imagine the content of your cards to be like layers. With the z-Index, we can display an element either on top of other stuff, or below it.
| |
| |
The background is now controlled by the field.
This template works similar to our first setup. The content of the Gender-field is inserted as class of our div. A fixed set of classes then specifies the background color. This time, we also extend the div across the full width. The fixed-position makes the position independent of scroll, so it always stays put (otherwise it would move out of view when scrolling).
Summary
CSS offers some interesting options to help you memorize your cards. You can automate a lot of clues, without using JavaScript, and changes in CSS sync across devices via AnkiWeb. With the new upcoming version of Anki, the rendering engine (what actually displays the HTML code) will change, so we can even use more recent features of CSS3. If you have any questions, more ideas/requests or a custom CSS setup, let me know in the comments!