Hands on — Color models and ImageJ
Posted on October 5, 2016 | Reading time 8 minutes- You will learn how the convert an image to RGB or HSV channels
- You will get to know the color threshold tool in ImageJ
Setup
Now that we’ve looked at color spaces and models it’s time to put that knowledge to use. I will be using Fiji to illustrate these steps. We will use the image below (from Mary Ann Thompson) as an example. The original is available (in higher resolution) on Wikimedia Commons. Just do a right click and select copy on the image below. You can then paste it in ImageJ via Edit → Paste (or Ctrl + V).
Please note: This image is in JPG format, which is lossy. Saving this image again and again (even with a quality of 100) will cause artifacts. These can even influence your analysis. It’s best practice to use a lossless format (e.g. TIF) when storing your data. Also: never overwrite your original data! Always work on a copy.
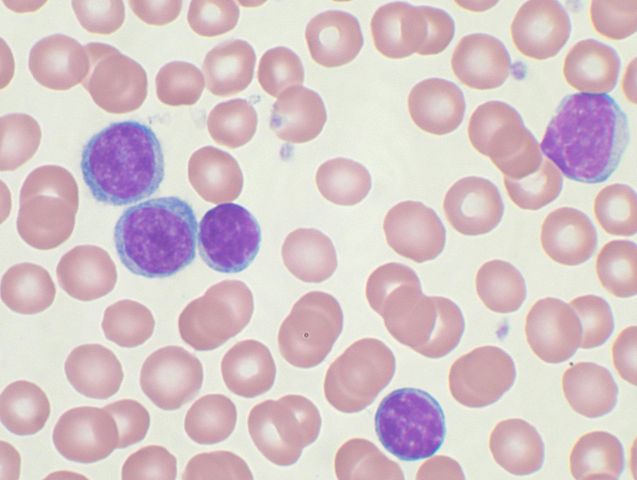
We will use this image to put our knowledge of color models to use
Splitting the image
Let’s assume that we are interested in the darker cells, and want to select them using a color threshold. So, let’s start by splitting up the picture into the RGB channels. This can be done via Image → Type → RGB Stack. As the name implies, your image will be turned into stack composed of a slice for the red channel, one for the green channel and a third one for the blue channel — an RGB stack.
The label of the current slice (yellow) displays the channel that is currently displayed. You can navigate to the other slices with the scroll bar (blue)
Identifying the channels of interest
Now, lets think about what we are actually looking for here. We want information, that tells apart the originally purple cells from the rest of the image. So we check, if one (or more channels) depicts these cells very bright and the background very dark (or vice versa) — in other words: we are interested in a slice with large contrast between our feature of interest and the remaining area of the image. Which channels would you pick?
Original
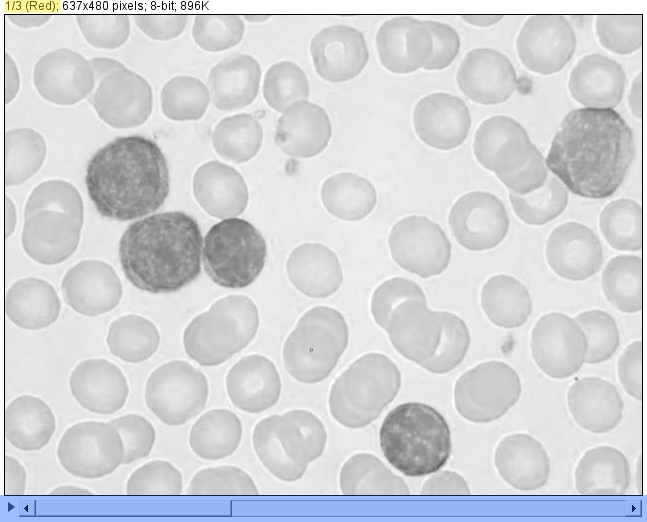
Red channel

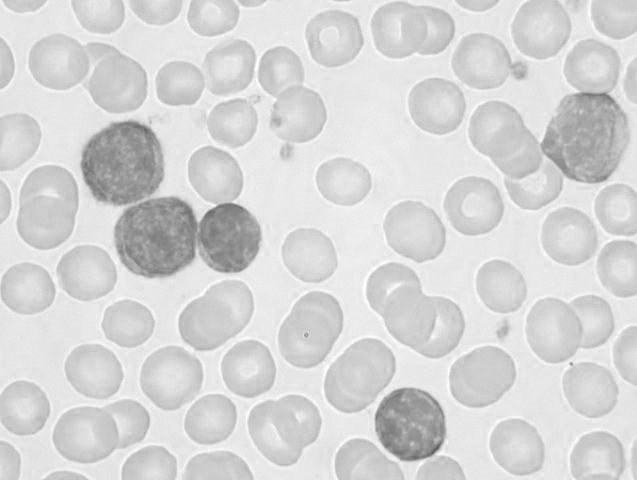
Green channel
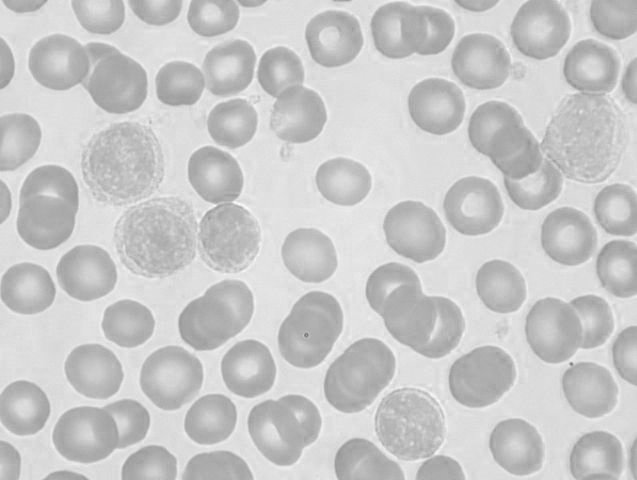
Blue channel
The red channel seems to display our cells really well, while the red blood cells remain more pale here. The green channel appears similar, although the erythrocytes appear darker here. The last channel — indicating the intensity of blue — displays our cells very bright; they almost fade into the white background. Let’s take a mental note: the feature we’re interested in seems to stand out in the red and green channel.
Recombining the stack and HSV
There are two options to change the stack back to the original image:
- We can recombine the RGB stack with Image → Color → Stack to RGB (this will create a new image, but we can close the old one)
- We can simply change the type with Image → Type → RGB Color
Both options work just fine. We can then change the type to an HSV stack with Image → Type → HSB Stack (remember: sometimes the V for value is replaced with B for brightness). Now look again if our cells stand out in one channel.
Original
Hue channel
Saturation channel
Value (= brightness) channel
The most promising one seems to be the saturation. The pale red blood cells have a lower saturation than our deep purple cells. Let’s add this information to our mental note, and recombine our image via Image → Type → RGB Color
Color threshold
In imaging, a threshold assigns every pixel one of two categories. With our cells these categories will be:
- Is a purple cell
- Is not a purple cell
Note that both categories complete each other — there is no third possibility or an uncertainty. Every pixel will either be of category one or two. Let’s open up the color threshold menu with Image → Adjust → Color threshold…
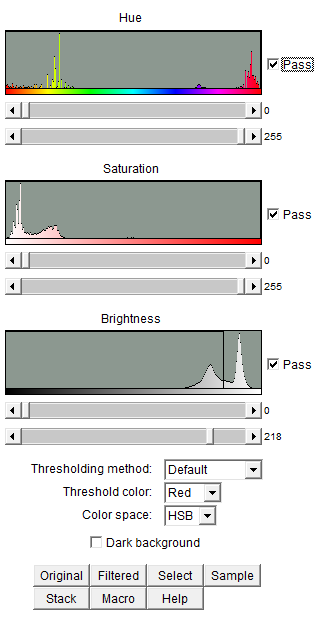
The color threshold window.
General layout: You can notice that the window is split in several parts. The vast majority of space is occupied by settings corresponding to the “parts” of our color model. Since I’ve selected “HSB” at the bottom (in the Color space setting), these “parts” are hue, saturation and brightness. You can switch to another model, e.g. RGB and see how the three controls will change to red, green and blue. But for now, we will leave HSB selected.
Buttons: There are also several buttons. We are interested in the first three:
- Original displays the original image
- Filtered creates a color coded version of your image. Everything that certain criteria — which we will talk about later — is indicated in red. Everything else is kept as is. You can change the color between red (default), black and black and white. The last will create a picture in which the “selected” signal is white and background is black.
- Selection creates a selection containing everything that “passes”
There are also several other buttons. Sample will try to create a filter based on the current selection. Stack applies your settings to the remaining images, if you have a stack open. The last button (Macro) can create code used for automation. These buttons are not relevant for us in this example.
Filters: The filters are made of histograms, a range selection (the two scroll bars) and a mysterious Pass check box. The histogram displays how many pixels have a certain hue, saturation or brightness. Since we have a lot of reddish cells, we can see a peak in the red area of the hue-histogram. With the scroll bars beneath the histogram, we can select a range. This will be indicated as a black rectangle on the histogram. Now, before we come to the Pass check box, we need to understand what this filter does.
Select 0 on the upper slider of each filter, and 255 on the lower slider. Make sure that Pass is checked:
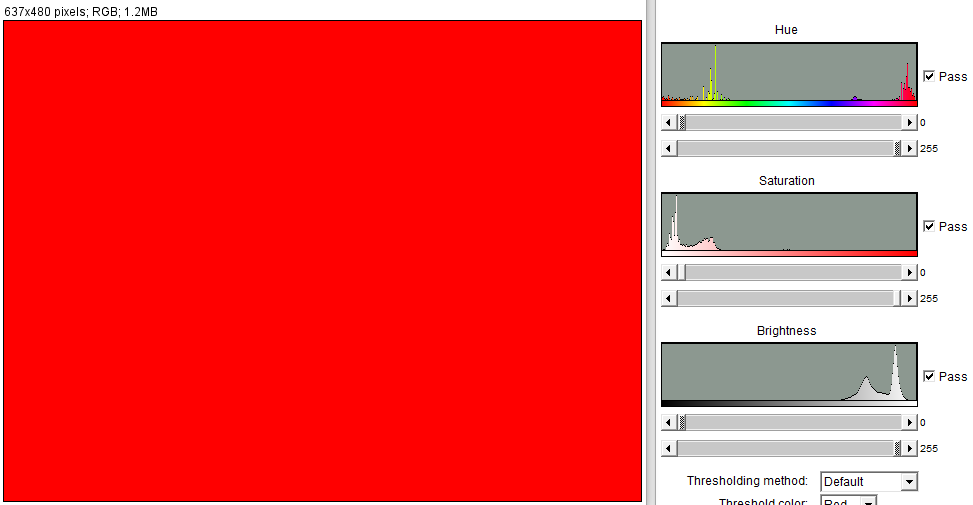
Let's adjust our filter so that everything passes.
Now the complete picture is red. This is because we perform three checks:
- Is the hue between 0 and 255 (unfortunately our 360° are mapped to 255 values. This has technical reasons)?
- Is the saturation between 0 and 255?
- Is the brightness between 0 and 255?
If everything can be answered with “yes”, our pixel fulfills our filtering condition and is colored as red.
Now uncheck the Pass on the Hue filter. This will negate our first question. Instead, our conditions are:
- Is the hue not between 0 and 255?
- Is the saturation between 0 and 255?
- Is the brightness between 0 and 255?
And since no pixel satisfies these conditions, nothing is colored in red.
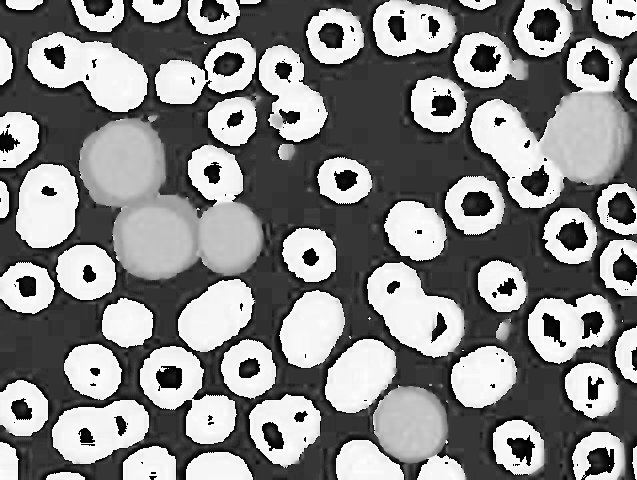
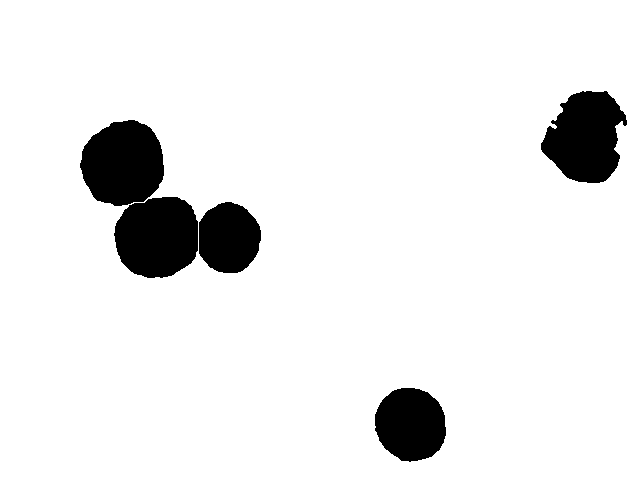
Selecting the purple cells based on HSV
No, let’s take a look at our mental note. We determined that our cells were easy to recognize in the saturation channel. Adjust your filter so that every hue and every brightness passes. This can be accomplished by either selecting a range of 80 to 255 and the pass option or selecting the range 0 to 80 without the pass option:
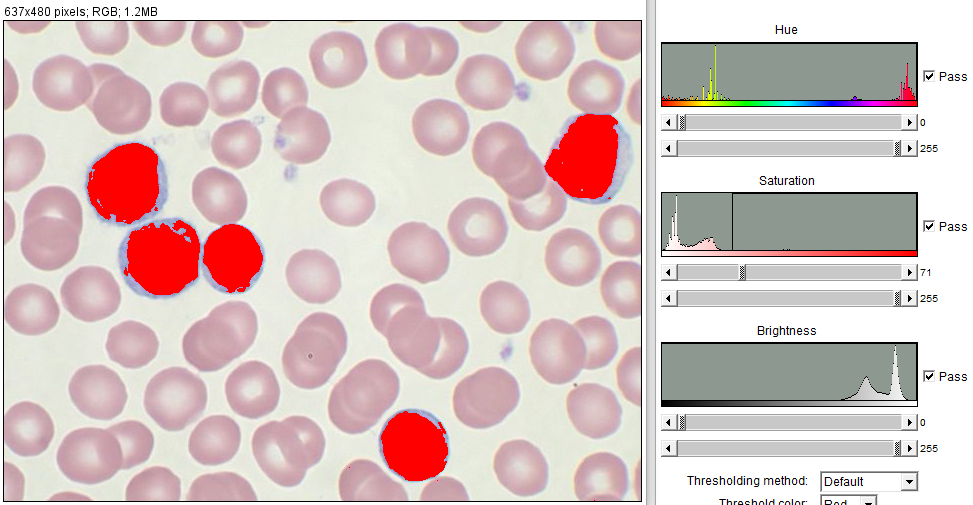
These settings seem to select the purple nuclei rather well
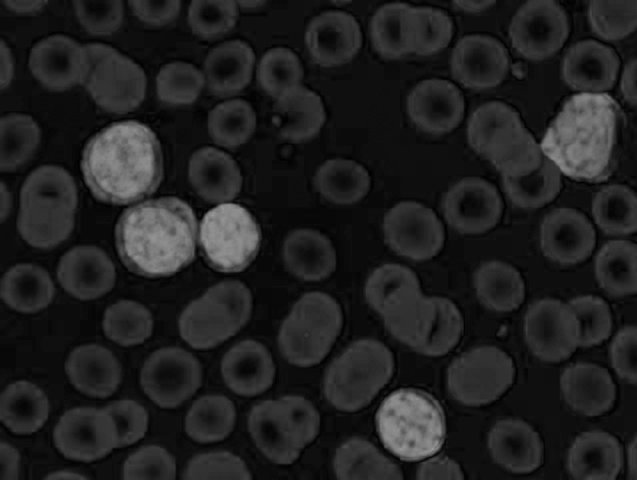
You can see that the nuclei of the purple cells are selected. If you want to select the surrounding cytoplasm as well, we have open the saturation filter even more, so that the whole cell is selected, e.g. let a range from 11 to 255 pass. Don’t be confused by the erythrocytes, we can exclude them based on hue. Adjust the hue filter to only let blue and violet colors pass. For example like this:
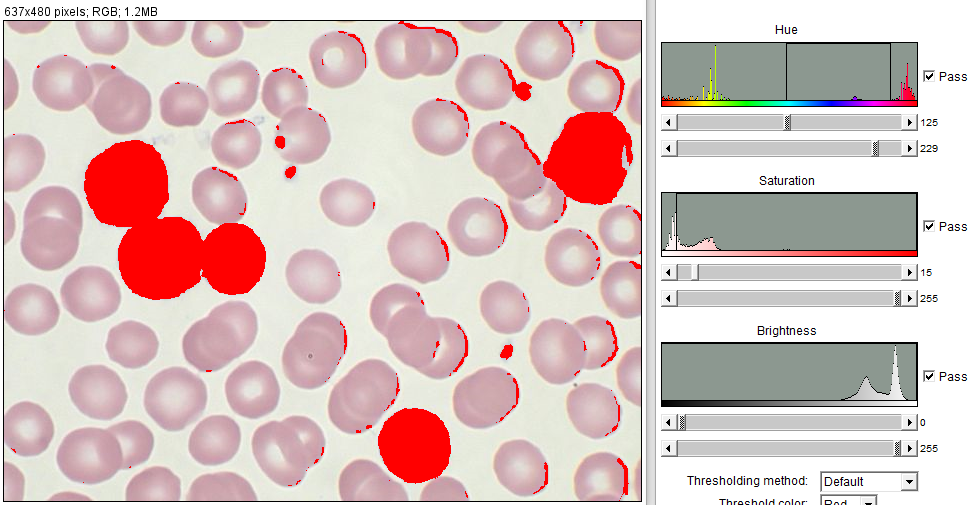
By opening the saturation filter even more (while constricting based on hue) we can select the complete purple cell
But unfortunately some parts of the erythrocytes are selected as well…
Selecting the purple cells based on RGB
You should now know how to use the color threshold window. So, try to create a threshold using the RGB option of the color space setting at the bottom of the window. I suggest opening up all filters and starting with something where every signal passes. Also try to remember: in which channel were the purple cells easy to identify?
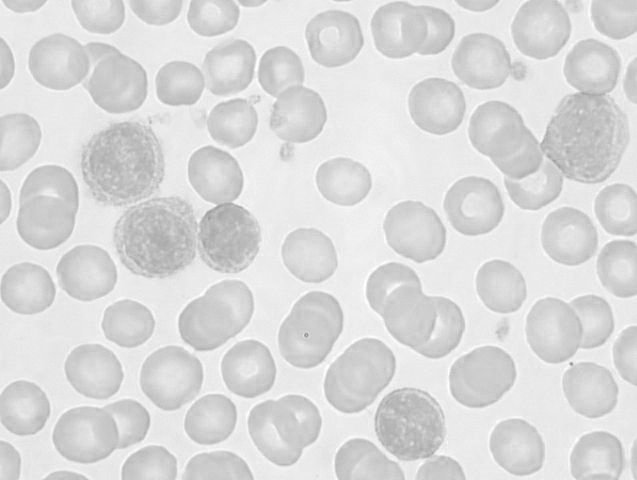
I ended up with the settings below.
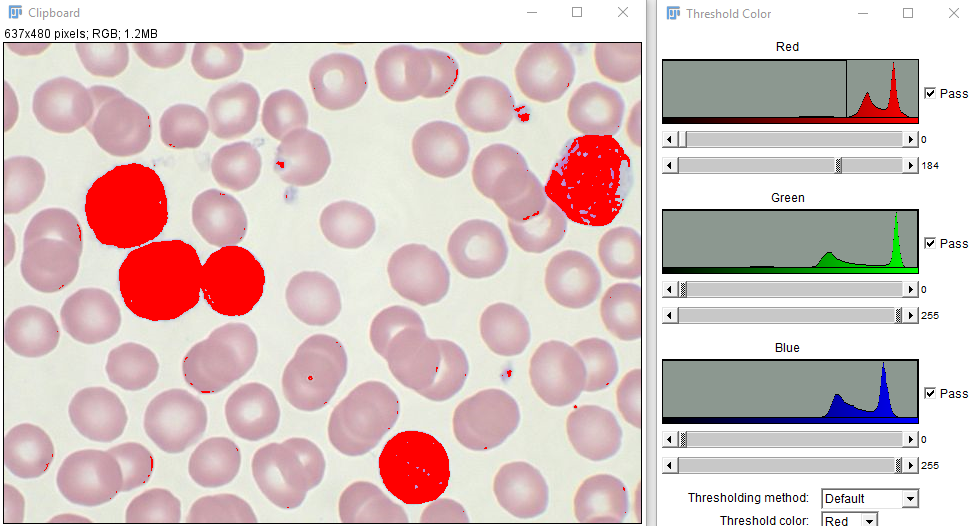
Thresholding based on RGB
You can see that the upper left cell is really causing trouble, since it is so bright. The color of it’s cytoplasm is very similar to the color of a bright erythrocyte. But as a start, we didn’t do too bad.
Outlook:
We’ve used the color models the see if we were able to create a threshold using the RGB and HSV color model. We had a look at all the channels to get an idea of possible threshold approaches. We determined which channels displayed the desired feature prominently, and used this knowledge to create settings to extract this feature.
The result is still not perfect. Depending on your settings we still would need to tidy up this selection. We have some “false positives” in our data, so we would still need to clean up the result of the threshold. But we have created a solid foundation for further steps. If you’re looking for example to practice color thresholding here are some ideas:
- Take a picture of a rainbow and play around with the RGB and HSV models. Here you can also play with the pass option
- Use the image of a flower field distinguish between grass and flowers
- Try a sunset photo to select the sky and the ground
- Use a fluorescent merge image and see, if you can select the original channels of this merge image.
ImageJ contains tools to clean our selection. We can also split the cells and measure them.
Image sources
The original image of blood cells (by Mary Ann Thompson) can be found on Wikimedia Commons and is licensed under the CC BY SA license.